Friday, October 4, 2013

Washer Machine not spining, but drains. whirlpool brands [kenmore, kitchenaid, etc.]

If Your Top loader washer machine is not spinning and you hear a hum. Sometime is can be a reasonable fix.


To have your machine  look like this- see my other blog enter to take the case off and repair water pump.

You will NOT need to take the water pump off. Follow the steps to get you to this point in the picture above.
removing pump hoses from pump end can make job easier.  caution: metal edges of machine are sharp.

In most cases you will need to replace a Coupling

Here is what a new coupling looks like. I can usually purchase $5- $20

Picture on the left above is New and the Picture on the right is Old and Broke. you can see how worn the rubber holes are and the plastic part of coupling is what always breaks.


Sometimes you do not have to unplug the wire harness, If you have enough wiring to set the motor aside.


Remove the 2 screws see above... follow the arrow... see the one screw...... another at the opposite side bottom.
Remove the 2 screws ( that I mention above) from the motor mounting clips and remove the spring clip that holds the motor in place
Next pry both plastic coupling  parts off..... 1 from the motor and the other from the gear box.......

    
Tap New Coupling part on to the motor shaft and gear box shaft

Put rubber part of coupling on gear box end and aline with motor


Coupling part with holes in rubber part of coupling
Reclip motor.....make sure that the rubber motor mounts are in place
Place 2 screws back inclips after putting clips back in
Reverse your steps to assemble what you took apart.


Thursday, September 12, 2013

Washer machine replacing the drain pump

One of the issue for replacing the pump
1. If you find water on the floor, One of cause can be the pump sometimes will wear a hole in the plastic casing, cause water leaking.
2. I have a few times, found clothing in drain pump, usually it will hum - squeal - DOA.
3. If your machine is not draining the water out, this can be one of the issues. the other could be lid switch.

To replace the pump
  1. disconnect the machine from the electrical outlet
You have 2 ways to get to the pump
releasing control top
  1. You can remove the outer case of the washer. I have explained in prior blog of July 24, 2013 removing washer machine case
  2. You will need to pull the machine out from the wall - to give you room to lean the machine back- to go from underneath the bottom of the machine. It will make it a bit harder to work tight space, but can be done
 I prefer to take the case off, some short cuts are not always a short cut.


  1.  I will remove the 2 screws holding the control top in place. If newer model use a putty knife to release the spring clips, so you can lean / tip the control panel backwards.
  2. Disconnect the Lid switch connector    (pic on right)
  3. Release the brass spring clips - with screwdriver
  4. Bring washer machine case forward then lift off from the frame     ( at the bottom) of the machine
  5. Can not stress upon the metal is Sharp, be-cautious                                                                                                                                                                            
  6.  With Tool (Pliers) slide hose clamps back on hoses, /pull the hoses off pump
  7. With screw driver I like over size screwdriver or big in size. to pry off the 2 spring clips that hold the pump in place on motor of the washer machine. (pop the 2 clips off both sides of pump].
  8. Now pull the pump off
  9. Replace with new one, follow in reverse order


                                                                                              pump   >


 If you have any question you can comment, I will reply back


Like us on Facebook.com/FredDiyGuru

WE WELCOME YOUR COMMENTS - CLICK THE ORANGE COMMENT BELOW

DON'T FORGET TO CLICK ON THE LEFT SIDE FOR MORE DETAILS ON HOW TO REPAIR,   TIPS AND MAINTENANCE  

You can donate to our Free source on how to, by clicking on Paypal button any amount would be greatly appreciated

Thanks
Hope you have a good day and I hope this helps and saves you money in repairs

MORE TO COME SOON


Friday, September 6, 2013

Washer Machine Agitator

The washer machine agitator has parts inside that are very common to wear out, they are called Dogs.
If you notice the clothes have not been swished around back and forth. Most of the time you will find the dogs are worn out, extremely inexpensive to repair - parts are under $6

To start
  1. unplug the washer from outlet
  2. open the lid of the top load type of washer machine
  3. the center cap (top) will come out, some brands will have a slot for small screw driver to pry off. You should be able to take off by hand. if not pry without damaging either part.
  4. under the cap - down inside the agitator - you will find another cap clear, usually pulls straight up and out - do not loose and check o-ring make sure it is in good condition. Very common the o-ring is cracked. I'm a perfectionist I like them replaced, it will keep water from going into the rest of the agitator. If you must, you can try to silacone the ring back. Neatly and clean - don't waste your time if it is sloppy.
  5. You will need a long extension socket and while holding the agitator from moving. Take the bolt out from the inside the center of the agitator.
  6. Pull agitator out.
    Illustration of Washing Machine Agitator break down
  7. Place agitator on solid surface - with clean shoes step on each side of the agitator- to pull the agitator apart, [ most have some melted plastic tabs that will pull thru or break off when separating agitator]
  8. Remove slide on plastic keeper ring and old dogs, put new dogs in facing same way as old ones.
  9. Then reassemble in reverse order, make sure the dogs stay in place when reassemble   
We have more information to the left of the webpage CLICK ON THE DATE of Blog

We WELCOME comments or suggestions........We love you to LIKE us on Facebook  click here

COMMENTS BELOW click on comment

Saturday, August 24, 2013

Changing Dryer Cord

Changing a Dryer cord from a 3 prong to a 4 prong....Most machine will come with a 3 prong cord. I can look at the cord (98% of the time) I can tell 3 or 4 prong by the color of the cord. Grey cords are usually a 3 prong and 4 prong are usually Black and round. 
  1. I recommend you click off the breaker to the dryer. I personally do not, because I know how to Not touch the prongs that go into the outlet. Disconnect (pull) the cord out from the outlet.
  2. Some will need to disconnect dryer vent from Wall. .....I personally do not.  Me being experience, I can usually lean Dryer forward -gently . ........." T i p " only bad thing is -I have big hands, on occasion can loose the terminal screws inside the machine, sometime, short cuts are sometimes not a short cuts. You might want to pull  dryer out.
  3. Pull Dryer out from wall, since it is now disconnected
  4. Locate where the cord is coming out from, above the cord is usually a cover for the terminal block,  this is where the cord connects    
  5. Remove cover some will have 1 - 2 screw if on top part of the unit - Some peoples units can be locate at the bottom half of a dryer and usually more screw to remove. Either way remove the screw. Covers will different with Brand and Models
  6.  
Dryer Backside- Wiring (above)
Wire removed
    Depends on the screw type and dryer cord wire ends, if you can short cut
    With a Nut driver 3/8  losing up the screws  to remove wire -some cords wire ends are u shape where you can slide out screws when the screws are loose. Mainly you will not need to remove the screw all the way out. tips on tools to use to remove the terminal screw- some people can use a common phillips or screwdriver. I personally like the nut driver to hold the screw inside the nut driver, less likely to fall inside machine. I do not like taking the larger backside panel off to retrieve the lost screw. I will, but prefer not.
    CAUTION
    Remember I said, I can or will  drop screws inside the dryer, this is the part, If you
    protect the screws from going inside or use a tool that is magnetic. Will Help Prevent them to fall inside the dryer
      You will remove the 3 grey wires from terminal block and disconnect the green (picture is white wire on left) (by my index finger knuckle)
      Next is to loosen both screws and remove 1,or both screws on the clamp
       Here in the picture the clamp off being take off.
      7. Pull the cord out
      8. Replace with New Cord
      9. Put the black wire on the END of the terminal block, Does not matter which end you screw it to. 
      A must with the neutral - white wire connect back to the middle- center of the terminal, connect wire removed from chassis screw and put on center terminal with white wire from new 4 prong cord.
      Red wire goes back on one of the other end of terminal block.
      Green wire coming from your new dryer 4 prong cord, connect it where you disconnected the green wire that stays in machine, chassis ground.  I will tuck the old green up in the machine,taped off or put it on center terminal since thats where it comes from with new cords white wire. You have the green wire now coming from your cord, that is your ground wire. If you do not connect you can get shocked touching the machine.
      Some dryer motors will not run with the ground not connected. Connect the green to the machine. in the picture above it was the white wire by my hand. " remember" 
      One of my other picture ( above ) shows the green wire being green. either picture is correct.
      And now you go back to the steps to put clamp on cord - outside -back of the Dryer 
    4 prong cord
       
    Place the cover back on.  Now the fun part getting the vent back on dryer to place back how you found, if already in place. If not and just moving the dryer in, I ALWAYS place dryer in first and then install washer machine.  Go read my dryer tips and maintenance on how important it is to have your dryer vent placed correctly.

    4 Prong outlet on your wall for power

     goto my blog archive on the left of the page for more details

    Please LIKE Us on Facebook.com/FredDiyGuru 

    Comment at the bottom of this blog 


    Friday, August 23, 2013

    Washers Complaint and Review

    I did not like the information of the Best washer reviews website,  I was reading. I thought maybe I am thinking and researching this incorrect. I should research Complaints from Real People. consumer affairs.com

    Here is one of GE customer comment - click on the link above to view all 525 comments and review.
    If you buy a GE Profile washer or dryer, then make sure you buy the extended warranty for it as you will need it! I have had nothing but trouble from this washer, and now the dryer, since the day I owned it. I have had it repaired 3 times in 3 years. Basically the same issue - just won't spin right. This washer is advertised as a high efficiency washer and that you will use less water. Well, it might use less water but it takes three times the electricity as a top load one would. If you want your clothes rolled into a ball, then this is the washer for you! If you want to have to take your clothes out and hand wring them out so it can spin, then this washer is for you! If you want to have it serviced once or twice a year, then this washer is for you! If you want to take 2 hours to wash a load of blankets, then this washer is for you!

    Here is info on LG washer Machine has 1003 complaints and Reviews  Consumer affairs. com

    This is one of LG Client complaint
    Do NOT buy any NEW Washing machine with a "Load Sensor"! It senses the weight of the load and determines what amount of water to add to wash the clothes. Since the Government has to be involved with every aspect of our lives to save energy & conserve water, this device is crap! There is never enough water to wash the clothes and the clothes do NOT come clean. This mandate has sent us back to the early 1900's way of doing laundry with an old wash tub, scrub board & old soap that actually cleans the clothes!!! I can't afford to buy new clothes every month & refuse to wear dirty clothes!

    I see alot of these complaints reading that client are upset with the washer machine not lasting over 2 years, mainly these are the digital or front loader machine.

    This is exactly what I have been stating on the new type of washer machine....Its like antique cars are built better to last. Same with Top Load washer machine. Why do you think old people still have the olive green appliance or that mustard yellow color. Built to last.


    More information on the leftside of PAGE by date 

    tips - maintenance - video on how to use tools- click on dates or title

    Click on comments to leave comment

    Like Us on Facebook.com/FredDiyGuru  


    Review for 2013 Washers

    I  feel you get more for your money, if you purchase a Top Load Washer machine ( No solid state preferred). I did some research, this is just my opinion. I will welcome any comment to differ or agree.
    To Start, why do they make you believe a front loader washer machine is worth your money. I'm sorry, but I am not well endow with money to be spending on repairs or money for product to run the machine. how they call front loader efficiency. I'm not sold on that idea.
    1. You have to clean the inside due to Mildrew ....eeewwww.....did anybody get that part. For that task you will  FILL with special cleaner ($$) and water (( for some$$)
    2. Costly Repairs - front loaders are not cheap to repair
    3. Replacing machine with in 2 years. I have not seen a front loader last longer. With My Clients. I welcome anyone's details. Leave comment here or FaceBook- LIKE us - Facebook.com/FredDiyGuru
    I know everyone like the digital type of washer machine. Let me explain from the service side. A digital has a computer mother board, and if a spot / area on that board goes bad. For the control panel.  Well, How much money do you have? it's not cheap to replace.  I guess if you can afford to purchase a Front Loader washer machine, then you have the cash for repairs.
    Some of these so call review sites, I do not know where they get their information source. I guess they are more a blogger than a real live service tech. One sites states How to pick  the best Washer machine is Know your Capacity = really, all machines are not real different on the size of control capacity- they all have small large exlarge - some will make you believe you can wash a comforter or rugs...NO NO NO.... sure you can, But, that will wear your machine's life down....I think we all pretty much use small and ex large size. Do we need any thing else? I strongly believe Comforters will  need to go to your local laundry mat. Who wants a comforter not really Clean on their bed or near their skin....( Not clean, because it was cramped in a machine to wash.)
    In regards to Front Loaders,that brag about efficiency.  Why would you want to use  No water to wash your clothes. I do not agree no-low  water wash machine.  You can comment if you think different, The only way we will learn is for you to comment. REAL People
    The next part this review site mentioned was digital panel is better than knobs. Wow, I guess, I look at it differently.  If a knob switch breaks it is cheaper than a mother board  by a few hundreds Dollars.
    To sum it up, start with these
    1. Brand of Whirlpool, Kenmore, Estate, Roper, Kitchenaid. is the brand I really have a personal liking to.
    2. Simple - Basic is the best washer- less digital - no digital is the best.
    3. my personal preference is having a Second Rinse - a must in my family.. Being a Service Tech, I like my clothes to be rinse twice. I do get dirty.
    4. Prefer a fabric softener in the agitator 
    5. Prefer a tall agitator - They are better for a cleaner clothes
    6. prefer no bleach dispenser- Or do not use them- bleach likes to rust metal...
    7. Metal type of wash tub, I like porcelain and stainless steel tub
    Take this info down when you go to your store, Me I love to look online first, save time- time is money.  If you have the phone app- that will look up prices by the bar code you can compare while in store. I like play around in the store with that app. Scan bar code to compare local area for that product and their prices at competition  store. Good Idea


    Friday, August 9, 2013

    How to use Multimeter

    Today my video is on how to use a multimeter - OHM meter.  I usually buy from Harbor Freight for $5.00. All have the same idea. Radio shack, Kmart, Sears, Home Depot, Lowe's, will have this available . Each store price will vary.  I am a real service tech, I break mine or most of the time I leave at my service account. I like the harbor freight price on multimeter tools.
    This  tool is one of the most important tools for a person to have. I will teach you today how to use an ohm meter to tell if a part is bad or good. A multimeter is an instrument used to check for AC or DC voltages, resistance or continuity of electrical components and small amounts of current in circuits. This instrument will let you check to see if there is voltage present on a circuit, etc.
    Lets first start with how to read a meter (multimeter).  The selector switch -center knob allows changing the function (volts, ohms, amps) and scale (x1, x10, etc.) of the meter.
    Now you have an idea, of how to use a meter. Lets get started on testing some parts.
    If you still need more information, you can ask questions from our comment button at the bottom of this session.


    Thank you for watching, Please share us with your friends and family. We will add more details each week, Fred still has alot to teach, worth following, Fred on Facebook . www.facebook.com/FredDiyGuru
    Please add Fred click LIKE on facebook, Google +  that is the only way we can grow is by you.

    Any questions or  comments CLICK ON COMMENT  to post a question

    we accept any donation too, keeps us around if you like us.......paypal donate button

    Husband and wife team

    Tuesday, August 6, 2013

    Dryer Maintenance - Servicing your dryer

    I have blogged on Tip for maintenance for your typical dryer brand like Whirlpool dryer, Kenmore dryer, Roper dryer, Estate dryer. if you read my blog for July 15th. You will find information on the do and don't. The air flow out of the dryer is very important. Do not let a simple machine go to waste, due to your lack of knowledge. I am giving that away. If you want your Machine last. Then Read the July 15th blog.  I have all my blogs by dates to the left side of my page.  Keep me as you will find more info as I grow. I do my best to update when I am not working, which is often lately. My employer is like the typical employer, lack of work.  I am far from a rich person. I am at the poverty level and want to share with others my experience as Service repair tech. I know there is people who is not rich and need advice before spending money, that you don't have. I understand and I do not charge you for this source of information. I do need more people following me and help me grow. It will be a win = win for all.
     Please take the time to read all of my blogs.
    I need to buy a multimeter for my next blog. I want to teach you how to use a multimeter. I having major issues and have been distracted. I just lost my home to foreclosure 7-17-13 and dealing with that drama and my 1984 van is my only vehicle which is a piece of ----. I am always out there working on it, since it has left me stranded a few times, far from home.
    Most of all my employer does not give me hours to have a decent paycheck. All of my life drama, causing my blog to lack.  I am working on getting a multimeter that is readable, mine is nasty dirty for I am a real live tech. I do use my tools alot. Everyone needs to learn, how to use a multimeter.
    I am working on that very soon, please be patience with me.

     If there any REQUEST for more information submit FRED Diy Guru  a COMMENT


     I will answer back.  We do Look forward in knowing someone is reading this. 

    Click on paypal DONATE-- if you like or add my webpage to your facebook timeline
    FRED needs you to help us too

    Read more tip and How to 
    go to left side of the page to blog Archive
    Thanks for stopping by

    ( COMMENT AREA IS under the dotted orange line to the left-bottom ).

    UNDER EACH BLOG IS COMMENT

    Friday, August 2, 2013

    Dryer will not turn on

    Fred Diy Guru 
    Whirlpool brand, Kenmore brand, Kitchenaid brand, Roper brand, and Estate brand Dryer
    Will not turn on
    Possibly a few things can be the issue. Whirlpool and Kenmore are easy to repair, if your Whirlpool Dryer broke, before you call appliance repair tech.  Check a few things before replacing Dryer parts.
    To check to see if you need a dryer parts or a new dryer. Then decide if you need appliance repair technician or if you can repair your broken dryer.
     1st check power to the dryer - should have 240 volt with 120v to ground / neutral. Check with a Multimeter.
    • If you have power - unplug the dryer appliance from the wall outlet
    •  
      Back of Dryer
    • Remove the back screws of the dryer and place in a cup or a bag. Do not lose the parts for your dryer. Fred's  personal tips


    Check the Thermal fuse.
    It will be couple inches long and white.

    Multimeter
    Most Dryers units will have this in the backside of the dryer and some are in the front of dryer with a removable front panel.
    • With your Multimeter you can check for resistance with OHM meter. Check to see if the thermal fuse is open or close ** I know not everyone knows how to work a multimeter. I will have video for that soon. If you need to comment on how to use. click on comment area at the bottom. I will help you ---my video should goes live in few days
    • Careful if you have to remove wiring to check
    • If reads open.....with your ohm meter- remove and replace
    • If ohm meter is reading closed, then the thermal fuse is Good, 
    • then it possible the timer is a problem. 
    • it could be a burnt wire 
    • it could be wire terminal not tight on the timer
    • Start button can be an issue, that is my next most common part that will be bad
    • If all other parts are good, then it might be the motor. I do not change motors to often. Time for a new Dryer. due to the cost of the motor and labor

    Thermal fuse-  new part


    Back of Whirlpool Dryer


     In the picture on the Left side of the picture is where you can see the Thermal fuse for the Whirlpool dryer

    IF YOU HAVE ANY QUESTION FOR FRED, FEEL FREE TO COMMENT  - or just say thanks to Fred diy guru

    We are just like the average Joe, if you want to donate, click on PayPal __DONATE __ button .
    We would appreciate any help
    Button is Located at the top and bottom of the page

     DON'T FORGET
    More information on the left of the page by archive date


    Wednesday, July 31, 2013

    Repair Washer Machine Lid Switch

    Washer Machine that is a top loader style and the Brand is Whirlpool washer machine, Kenmore Brand , Kitchenaid brand, Roper brand, Estate brand.
    I can Not Say this enough- Be CAREFUL - on sharp metal

    If the Washing Machine only washes and will not spin the clothes or drain the water out:
    The Lid Switch is broke - Bad lid switch......... when you open the lid - you should hear a clicking sound.
    To Replace the lid switch:
    You will find the 2 screws holding in place, under the casing - where the lid sit upon the case during operation
    Remove 2 Screws to replace lid switch
    You do not have to remove the case, but to completely do the job correctly, some people will need to - hands to big to fit between the case and basket rim. It does make it easier. You can do it without removing the case, push the basket out of the way, gently. I know most 85% of my lid switches are broke from the switch separating apart. if you can re glue and save you money then try it. super glue is great to use. I will add a zip tie -to add support for just the body of the switch -not the whole switch, to where you can not gently move the bar / paddle -to make switch work. Lid switches are not expensive $25-40.  repairing existing lid switch $5 (super glue, zip tie)

    Here is How To Remove lid switch if you can not glue
     
    After you remove the lid switch screws from the washer machine. Disconnect the Lid switch from the case.
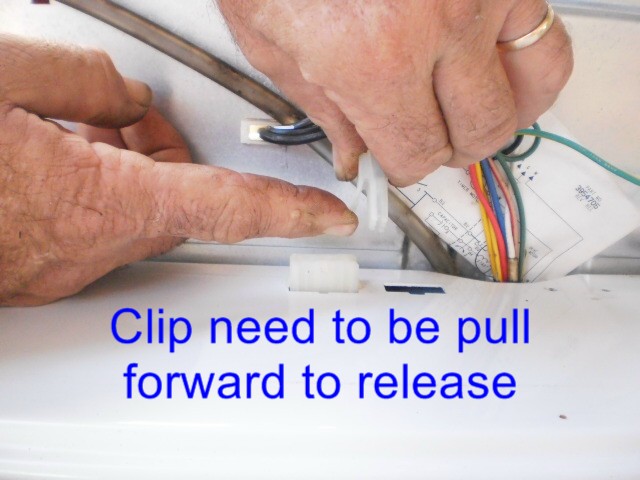
    Disconnecting the Lid switch by pulling the clip forward to release from the wiring harness.
    Releasing Lid switch from washing machine

    Remove lid switch wire harness from switch
    With tool push the clips on the lid switch
    By pushing the clips on each side of the lid switch, to release from casing.
    Lid switch will have --under the casing --a couple of metal clips, holding the wiring (plastic tube) casing. Remember BE CAREFUL when you reach underneath to find the plastic tubing that holds the wiring of the lid switch.  Remove the lid switch and replace with new lid switch. Most appliance part store can help you with the part. I use the Ocala appliance parts they are great in pricing. I will have them ship my parts order directly to me. Any appliance parts store can help. I will give you my personal opinion of who I recommend as appliance parts. http://www.appliancepartsofocala.com/
    I have used other appliance parts business but the service and cost, I get from these guys is worth me mentioning.
    Lid Switch looks like this NewNew lid switch part cost $25-$40 


    I buy the off brand for the whirpool washer machines. Did you know that whirlpool brands also make the Kenmore brand, Estate brand, Roper brand, Kitchenaid brand and now they bought out the maytag brand and changing some of the maytag  top load style washer machine - parts to the Whirlpool style


    MORE TIPS AND HOW TO go to blog archive on the left side of the page, broke down by date

    Wednesday, July 24, 2013

    Remove Washer Machine Case

    Good Day, today we will be taking the case off of a Washer Machine
    Kitchenaid Brand washer machine in picture
    We will start with removing the screws from the control top.
    on some brand you will find the screw like above or for brand like Kenmore they have the screws hidden in front.
    After the screws are remove then pull forward while lifting up to un hinge from the casing.
    Now pry the brass spring clips on both side out
    Careful with the backing to not let it flop backwards. I use a step stool or let it lean against something.
    Disconnect the lid switch.... and now you can remove the case


    and now you can work on the machine without the case being in the way.

    Next session is how to repair the Lid Switch on the machine.....come back next time
    IF YOU NEED MORE ANSWERS JUST COMMENT TO ME -- BELOW-- I WILL ANSWER AND HELP YOU....


    Tuesday, July 16, 2013

    Repair a Dryer

    CAUTION ** Major Appliances have extremely sharp edges and can cut like a razor edges are not burred 

    To change drum rollers on a Kenmore  / Whirlpool brand Dryers. You will need to make it look like this.... **First UnPlug electric from the machine
    Plus take the rear cover off -
    To remove both rollers and stud shafts--- pull the lint filter out if located at on top of the dryer case
          Remove 2 screws with a Phillips screw driver from the lint filter area (if located on top--( not the control top )
          Lift the front of the top of the dryer (above the door area) while tapping/ pushing the front top case forward (do not push on the control top panel)
         Swing the top lid toward the rear-  upward movement -out of your way. careful !! not to far, where it would bend the hinge, if falls backwards.  We usually have it leaning on a wall or brace it

    Unplug the door switch
    Remove 2 screws with 5/16 nut driver ( socket) near inside front top area - each side
    Hold tub upward slightly - while leaning top front case of unit -(( the door area ))- out toward you, about a inches to 2 inches the most- pull up on front panel to unhook clips from the bottom.
    set the panel aside
    now you have access to the inside of the dryer

    Perfect time to install belt
    Replace rollers
    or anything else that needs to be done

    Parts Parts stores this is one of my favorites parts store. I have personally used them for years, Really Good people.....they have earned the Guru approval


    Monday, July 15, 2013

    Tips for Dryer Maintenance

    If you have questions, submit through the comments, that way some one else can read and learn too.

    My tip for Dryers . If you take care of your dryer by making sure you empty out the lint filter, very important. Your dryer will last.
    If you live upstairs with a dryer vent goes up towards the roof... not good idea.You will need a professional dryer service tech to clean the duct work. Vent cleaning service . I say atleast once a year have the dryer vent serviced. I do not agree with builders who will have dryer duct venting to the roof.
    Open your dryer, do you see the vent holes in the back. They are there for a reason. If you fill your dryer and clothes covers the holes on the back of the dryer tub vent holes.  How is your dryer suppose to breath. Do Not have a huge load that these holes are not visible.  Make sure your dryer vent hose is in good shape, no holes and the shape is very important. DO NOT squash the hose. The hose needs to be good round shape --No FootBall shape. Round shape
    for  example if you place a toy ball in side the hose .....with dryer in place would that imaginary ball make it through your dryer vent hose curves from your dryer to the wall outlet. or due to it being squashed down, that imaginary ball would get stuck. if it would get stuck - then fix it  make it rounder, do not add any restriction to the air flowing out. Keep the dryer several inches from the wall for breathing room
    Thanks for Reading

    Thursday, July 11, 2013

    Tool You will Need to repair washer and dryer

    These will be the common tools to Get Started

    Pliers - - Phillips screwdriver -- 1/4 nut driver --5/16 nut driver --ratchet - 1/2 in socket - 7/16 socket

                                         Hammer is good to have also

    This is what a washer looks like when taken apart with no case

    The models I work on are Kenmore brand, Whirlpool brand, Estate, Roper, Kitchenaid and more.

    For some reason yours washer is not working or dryer is not heating. I hate seeing people who has to pay for another appliance when the one they have just need repair. Some times You can fix and some people I will give you idea, so you don't get rip off from your honest or church going kind of person.

    If a washer lid switch breaks = your machine will not process, the wash will sit there- it will aggitate but will not spin the load. If You make the room real quite, you will hear the click of the lid switch. If not then it can be the issue - broke   Where to purchase parts
    THE FIX : is lid switch $25-35 for part


    RSS Feed

    Feed Search Engine